
|
|
|
This page created December 1998, Updated 9/21/11
This page continues the story of NC6197M begun on the history page. With colder weather settling in during the fall of 1993, I had to put off further repairs to the wing fabric until spring. In the spring of 94, I began work again and came to the conclusion that things were looking a little rough. The chipping paint on the cowling was getting worse, paint was peeling off the belly, and the fabric on the wing had that "patched together" look. I also worried that there might be more fuselage rust beyond the repairs made to the tailwheel area in the spring of '93. I decided it was time for a complete restoration, and began disassembling the plane in April of '94. I guessed that it might take about three years. I was pretty far off on the guess. On April 4, 1994, I began keeping a complete "Restoration Log". On May 8, with help from friends in EAA Chapter 524, I brought the Stinson home on a trailer and began further disassembly. George Orndorff, Chapter 524 President, carried the fuselage on his trailer. The wings were in Henry Bergen's Moni trailer. It was quite a caravan for the 20 mile drive from Frederick Airport to my home in Damascus, Maryland
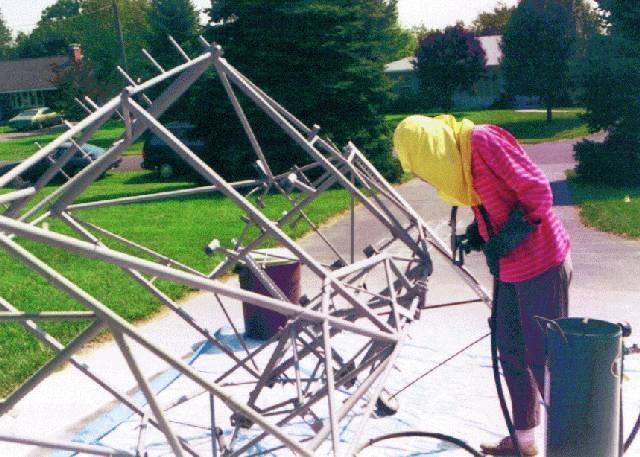
I completely stripped the airframe in preparation for sandblasting. Working in the driveway and my one-car garage, I sandblasted everything and gave the fuselage a coat of epoxy primer. I was chagrined to find considerable rust in the lower left longeron and the upper right longeron near the forward vertical stab attach point. I replaced about 20 feet of tubing. I made a jig for the fuselage, mounting the front of the fuselage solid to the forward wall of the garage. Using angle iron from old bed frames, I welded a fixture, bolted to the floor, to hold the tail post in position. Using a Dremel tool with cutoff wheels, I removed the rusted tubing. I replaced the lower left longeron from the cabin back to the tailpost. One lower diagonal was replaced. I spliced in a one foot section of the upper right longeron, at the forward vertical spar attach point. Throughout '94 and into the spring of '95 I continued to work on the airplane, cleaning, stripping, and scotchbriting parts.
My wife helps with sandblasting the fuselage in the driveway - gave the neighbors something to talk about.
The lower left longeron from
the cabin aft is removed for replacement.
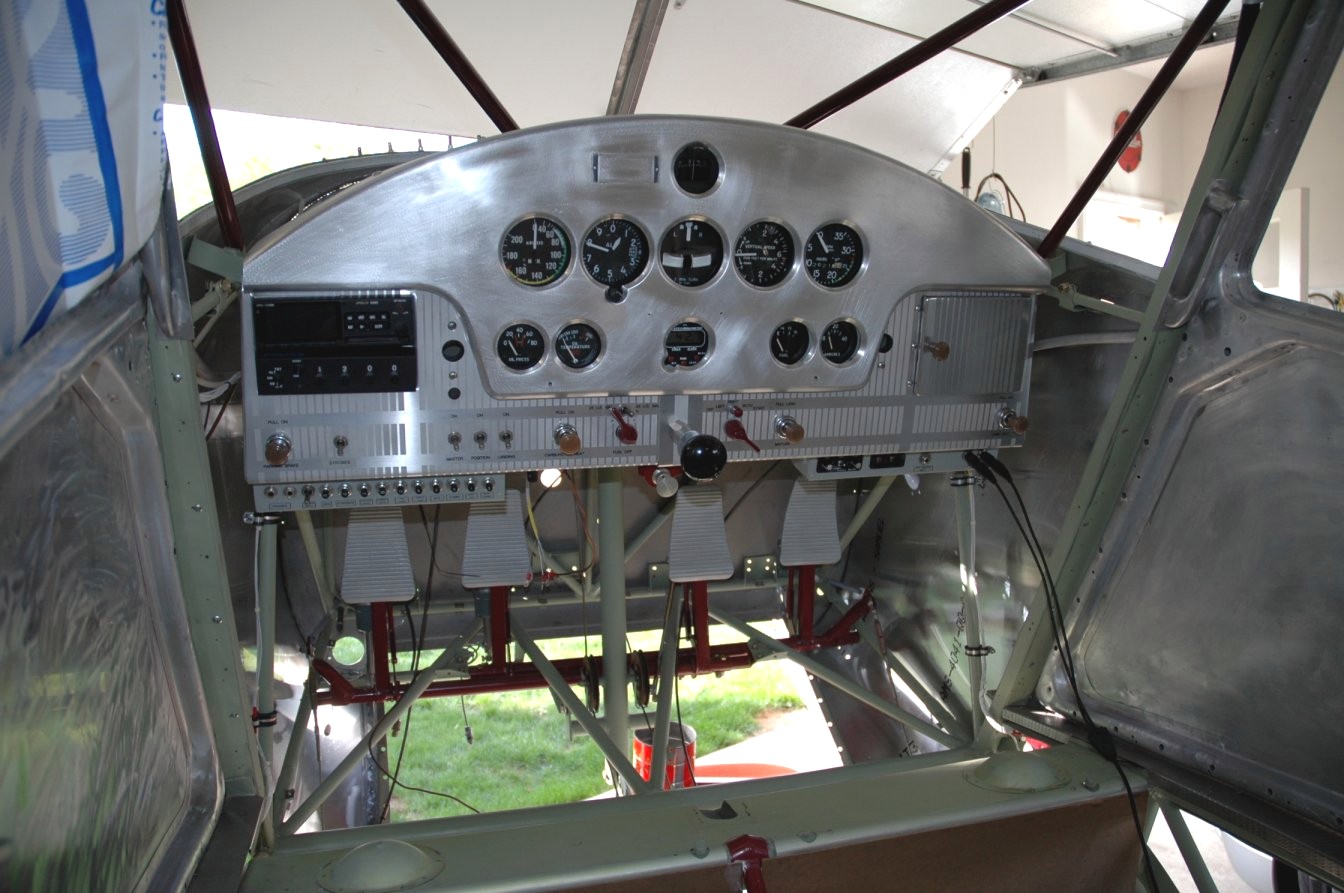
In May of '95, another big project, a 720 square foot family room/sun room addition to my home and an expansion of my garage, took over my time, and the Stinson project was "on hold" for more than two years. For a while in 96, the fuselage and wings "lived" in my wife's new sun room while the garage was expanded. I continued however, to do research on the history of the plane, hoping to restore it to its original condition. I pulled the upholstery off the front and rear seat cushions and found the original maroon vinyl cushions, in pretty good shape, under the rear cushion seat covers. The headrest area of the upper cushion was done in gray wool. Under the upholstery on the upper portion of the rear passenger compartment panel, above the "woody" paneling, I found the original gray wool. Under the new paint on some of the interior metal trim, I found the original maroon lacquer. With help from the Internet, I developed contacts with other Stinson owners and restorers. Larry Westin, a Stinson owner in California, provided much valuable information on his web site. I found the Southwest Stinson Club to be a great source of information. Bob Lyman, who does the Stinson forums at Oshkosh, sent me photos of his plane, a 108-3 with the original interior. Tom Messeder, a Stinson owner in Fredericksburg, Virginia, who had done considerable research for an accurate restoration of his plane, verified that PolyFiber "Stinson Maroon" polyurethane was an accurate color match. After studying the various covering systems, and taking an Alexander Sportair covering workshop, I made the decision to go with the Polyfiber covering process. I attended the Stinson Aerodrome Reunion in San Antonio, Texas in May of 1997 and soaked up information and ideas and took lots of photographs of the 50 Stinsons gathered there. Back to Work In the summer of 97, with additions to the house complete and a nice heated and air-conditioned 2 car garage-shop to work in, I got back to work on 97M. I overhauled the shock struts, brake calipers and master cylinders. I bought new chrome brake disks. I found pinholes in a couple of diagonals on the right side of the fuselage, and replaced that tubing. After some more sandblasting, I put the final coats of Poly-Fiber epoxy primer on the fuselage, and it was time to begin putting the fuselage back together. I treated the longerons with Poly-Fiber "tubeseal" rust preventative. Stinson Maroon Aerothane went on the exposed portions of the fuselage tubing behind the windshield and in the rear cabin at the seat supports. By December of 1997, I had the fuselage back on the landing gear, had made new floorboards from aircraft birch plywood, and had reconstructed the baggage compartment with new materials. Gene McBee, a Stinson restorer in Oregon helped me with new "woody" panels for the rear cabin. I was making weekly calls to Aircraft Spruce and Univair. All new cables and pulleys were purchased and installed in the fuselage. A new firewall, fuel lines, and skins for the rudder were purchased from Univair. One by one, fuselage formers and stringers were cleaned and repaired as necessary. I spent many hours studying the Stinson parts manual and the photographs I took during disassembly. I had quite a puzzle on my hands! At Oshkosh 98 I purchased an Apollo GX65 GPS/COM and began planning my instrument panel restoration. During the fall of 98, new lower instrument panels from Schultz Engineering were cut cut and installed along with restored upper panel sections. A glove box from Univair was installed in the original location and a new glove box door, closely matching the original, was installed. To avoid cutting any non-original holes in the panel, I fabricated subpanels of .032 aluminum for the circuit breakers, the intercom, and the ELT annunciator. The original auto-resetting circuit breakers were replaced with modern breakers and I installed an avionics master switch. The subpanels also provided space for the headphone plugs and an on/off switch for the electric turn coordinator. The altitude encoder for the transponder would now live in the spot vacated by the old circuit breakers. An ACK ELT would be located just aft of the baggage compartment, accessible by opening the flap at the rear of the baggage compartment. During November 98 I installed all of the instruments in the panel, but hookups would be left for a future date. I used mini scotchbrite pads on a die grinder to burnish the stainless firewall. I installed new rudder pedals and rebuilt the brake master cylinders, adding new reservoirs and seals. Over the winter of 98-99, I worked on the lower and side stringer assemblies, completing their installation as well as the final installation of the baggage door and main door frames. Wood interior supports for the upholstery were varnished and installed. I did work on the vertical stabilizer, deciding to disassemble it completely so I could attack some internal corrosion. Unfortunately, I also found a crack on the vertical spar so needed to replace that. Work continued at a good pace until the summer of 99 when I bought my Aeronca Chief. About that time I came across a vertical stab from a wrecked 108-3 and decided to use that instead. I began stripping paint from the new stab but things began to slow down in 2000 and did not pick up again until October 2004. In the meantime, life went on, my daughter went off to college and my son started high school. The Stinson project remained pushed off to one side of the shop and a couple of motorcycles began to take up space once devoted to airplane restoration. Back to Work.... Again. Things began to change when I retired in July of 2004. By the end of October 2004, with a new storage shed in the back yard built in the summer of 2004, the garage/shop was ready for me to return to work on the Stinson. After a good shop cleaning, I began by getting the shock strut shafts hard chromed to solve a seepage problem. I also began the restoration of the door handles and installed the upper fuselage stringers and assorted fairings. I did some electrical work, restoring the indirect panel lights and did some wiring of the circuit breaker panels. I restored the seat frames, fabricating new webbing where needed. By the end of May, 2005, I was working on the restoration of the baggage door and the pilot/passenger doors. Stripping old paint is a nasty job! Working on an off through 2005, I continued work on the doors, and finished the installation of the wood fairings at the leading edge of the fuselage where the cabin vents are situated. I worked on the fuel lines, drew up a detailed wiring table and electrical diagram, and began wiring the control panel switches. In January 2006 I made the decision to add Whelan anti-collision lights to the electrical system, so I modified the circuit breaker/switch subpanel.
During February and March, 2006, did more work on the instrument panel and the avionics, including the harness for the GPS/Comm and wiring of the intercom. Familiy members assisted as I powered up the intercom and tested operation from all four positions - for pilot, co-pilot, and two rear passengers. I did more work on the windows and doors.
I made excellent progress throuhout the early part of 2006, working as much as 75 hours per month. I drafted a 337 form for my IA and he signed off the repairs to the fuselage I had completed earlier. He offered guidance for my repairs to the vertical stab and I replaced the top rib and made other repairs. I completed a good portion of the electrical system and avionics installation. I mounted the Whelan strobe power supply to the baggage compartment frame and forward wall. I mounted the GPS antenna. I fabricated a new boot cowl from .020 2024T3 aluminum, fitting it to the new firewall I had purchased earlier from Univair. Photo below was taken on April 17, 2006.
Throughout the summer of 2006 I continued to work on details - including finishing up some of the woodwork, resolving some issues with the GPS installation, cleaning and installation of belly panels, replacing worn rivnuts for the landing gear-to-fuselage fairings with platenuts, restoration and installation of the flap handle, repair of the seat frames, and assorted other details. Photo below was taken on August 22nd and shows the installation of the interior "woody" panels.
August and September of 2006 were productive months as I continued working on details. Floorboards were installed, more work was done on the electrical system, snap-in carpeting was fitted, front seat frames were installed for a trial fit.
In 2011 I discontinued the project for health reasons. Parts of 97M went to all parts of the globe to help others keep their Stinsons in the air. The engine went to Australia, the fuselage frame went to Canada. Others parts went all over the United States, as well as France, Ireland, and England.
|


