|
|
|
Control Column Universal Joint Boots This page created 2/6/99 Updated 3/4/99 Click on photos for full-sized image.
After 50 years, the original rubber boots on the universal joints on each control yoke end will need to be replaced. Here's where you can find replacements and what is involved in doing the job. First, you'll need replacement boots. You can find these at most bearing supply firms that carry Lovejoy products. The part number is: Lovejoy "D4Boot Upper Set2 Universal Joint" This is a set of 2 boots. I purchased mine from Applied Industrial Technologies, PO Box 905794, Charlotte NC 28290-5794. List price was $19.85 for the set in 1998. To replace the boots, you'll need to remove the control column shafts from the universal joints. Of course this means you'll need access behind the instrument panel, so this is easiest to do if the plane is disassembled for restoration. Otherwise, try removing the glare shield. These shafts are bolted to the universal joints with two close tolerance AN3 sized bolts with washers and elastic stop nuts. Avoid using standard AN3 bolts - be sure to use the original close tolerance bolts or exact replacements. 
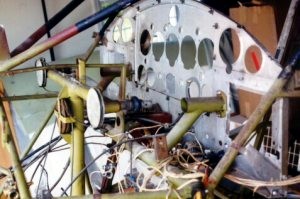
In this photo taken during
the dissassembly of N6197M, you can see the universal joint
Now, remove the old boots. The boots on the original universal joints were installed during the manufacturing process and are crimped on with aluminum rings that clamp into grooves on each end of the boot. They are of very soft aluminum and can be easily removed by prying them loose with a small screwdriver and cutting them with small wire cutting pliers. Once the clamps are off, the boots can be removed by sliding them off the universal joint. Mine were so dry rotted that they tore off in pieces. The new D4 boots differ from the old boot only in that they do not use the crimped on aluminum clamps. Instead, they use small tie wraps. Otherwise, they are an exact replacement. Clean and inspect the universal joints. If everything looks good, repack the joints with grease and slide the new boots on. To make the job easier, I packed the joints only partially with grease. Then, after the boots were in place, I used a syringe fitting on my grease gun to finish filling the boot. With the assembly packed with grease, you can add the tie wraps. Be sure to trim the excess end of the tie wrap so it can't catch on anything as the shaft travels from limit to limit. Now you're ready to reassemble the shafts to the universal joints. In this photo you see the new boot installed. The pulley for the aileron cable is at the left of the photo. Note that the control yoke shaft is not yet completely bolted to the universal joint - there's just one bolt temporarily holding the shaft in place. This photo was taken from the pilot's side on NC6197M much later in the restoration. In the right foreground you can see the radio trays. In the background, behind the passenger side shaft you can see the aluminum glove box. Look closely at the universal joint boot and you can see the black tiewrap on each end of the boot.
Back to the Hangar 9 Aeroworks Main Page
|